Key Things You Need to Do to Winterize Your Outboard
Prepping your boat for the cold winter months is called winterizing. If you plan to winterize your boat yourself, here are some winterization tips we’ve prepared to make sure you don’t forget anything.
Winterizing Checklist
Start by making a checklist of all the tasks you need to get to. You can find winterization recommendations from the manufacturer in the owner’s manual for your motor as well as the manual for the boat itself. If you are a boating amateur, it may be best to consult a friend with experience or contract an expert.
- Check how much fuel is left in the tank. Treat the remaining fuel with the right quantity of fuel stabilizer.
- Use the flushing port behind the engine or a set of flush muffs to flush out your engine with fresh water.
- Turn your engine on, remove the cowl, and spray a healthy amount of fogging solution into the front of the engine where the air intakes are.
- Keep the engine running, and remove the fuel line. Keep spraying fogging solution until the engine dies. This is to make sure all the fuel in the carburetors is burned in order to prevent fuel evaporation that could cause a build-up of mineral deposits.
- Put a heavy coating of water-resistant grease on the shaft and threads of the propeller.
- Don’t forget to change your lower unit oil.
- Polish the surface of your engine with wax or another light lubricant.
- Finally, wash the entire engine with soap. Finish by giving it a thorough rinse.
4 Essential Elements of Winterization
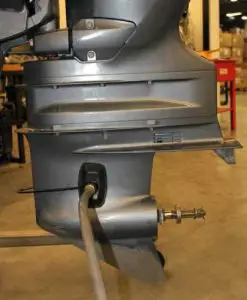
- Changing the gear oil in your lower unit is the most important winterization task. This will prevent serious damage from freezing temperatures that could create ice out of residual water left in your gear lube.
- Another essential winterization task is to put your engine in the tilted-down position and flush it out with fresh water. Running antifreeze through it afterward is unnecessary since both two- and four-stroke outboards will drain completely dry in that position.
- If you have a four-stroke engine, change both your engine oil and filter. You may also need to change your air and fuel filters, if recommended by your manufacturer.
- If you need to leave your boat sitting for a few months, you should apply fogging oil to your engine. If you plan to use it within a few weeks, this step is unnecessary and could even foul up your spark plugs.
If you have doubts about anything, it’s better to check with a service expert or a trusted engine shop than risk ruining your engine.
Is Fuel Treatment Necessary?
Storing gasoline, even for only two weeks, can cause it to break down. Lighter elements will evaporate, and heavier elements will start clogging up your engine. This can be prevented with fuel stabilizer. Make sure to idle your engine for about 20 minutes when you add the stabilizer to ensure that it works its way through the entire system.
Carburetor Rust Protection
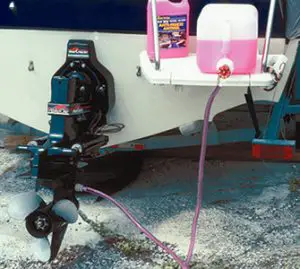
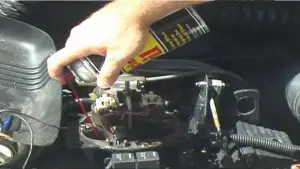 Fogging oil can keep the guts of your motor safe from corrosion and rust. Begin by taking off your engine’s flame arrestor, starting the engine, and spraying fogging oil straight into the carburetor. Next, pinch the fuel line to shut off its fuel supply and burn the carburetor’s leftover fuel. When your engine dies, lift out the spark plugs, coat the inside of the cylinders with fogging oil, and replace the plugs.
Fuel Injection Rust Protection
If your engine uses fuel-injection, fogging oil could cause an injector to hang up. To avoid this, complete the procedure in the above section with two-cycle oil rather than fogging oil. You can also add a bit of two-cycle oil to your fuel when you treat it with fuel stabilizer.
If you have a four-cycle engine, remove the carburetor drain plug and make sure to extract every drop of fuel. This will help avoid clogging your main jets, which can be damaged by even a little bit of fuel.
DIY Guide to Flushing Your Motor
Using fresh water to flush your outboard engine will rinse away any dirt, salt or other contaminants.
- If you have an older motor, attach a set of flush muffs to its water intakes and hook a water hose up to the opening. Leave both your engine and the water running until you begin to see clean water come out.
- If your motor is a newer model with a built-in flushing system, hook the hose straight up to the motor and run water through it for about 10 minutes, or as specified in your owner’s manual.
DIY Guide to Stabilizing Your Fuel
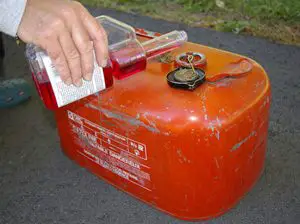 To prevent fuel degradation and clogged fuel lines during winter, it’s important to add some stabilizer. We like to use Stabil, PRI-G or Pennzoil.
- Top off your tank till it’s 95% full of gas.
- Read the instructions on the stabilizer package to find out how much you should add.
- Leave your engine on for about 20 minutes after applying the stabilizer to give it time to circulate thoroughly.
- If you prefer not to use stabilizer, you can also drain all the fuel out of your tank and fuel lines, and leave your engine completely empty all winter.
DIY Guide to Fogging Your Engine
Applying a thick coating of fogging oil to the guts of your engine will help to prevent rust and corrosion. For more specific instructions, see your engine’s owner manual.
- Many kinds of engines let you spray fogging oil into the air intake while they’re running.
- Don’t worry if you begin to see clouds of white smoke when you spray. This is part of the process.
- Don’t forget to disconnect the fuel supply and continue fogging until your motor dies.
- If you prefer to drain the fuel out of your engine during winter, you only need to spray the spark plug holes. Take the spark plugs out and spray a healthy amount of fogging oil into the cylinders. Make sure they’re fully coated by giving your engine a few spins with your hand while you spray. Finally, replace the spark plugs, but leave the wiring disconnected to help keep air and moisture away from the pistons.
DIY Guide to Antifreeze Flushing
 If your engine doesn’t have a tilted-down position or you want to be extra thorough, you can flush it with antifreeze to prevent ice damage. Most manufacturers recommend using environmentally-friendly, highly-concentrated (-100) antifreeze made from propylene glycol.
- If yours is an outboard motor, flush it out with fresh water, then connect an antifreeze kit to its water intake. Just remove the hose after the water flush, while the engine is still running, and attach a hose that runs to your antifreeze container. Keep the engine running until your antifreeze tank is dry.
- If yours is an inboard motor, take the water intake hose out of the seacock and place it in a five-gallon bucket of antifreeze. Leave the motor running on idle until the antifreeze gushes out of the exhaust pipe for around 30 seconds, then turn the motor off and put the intake hose back into the seacock.
DIY Guide to Changing Your Oil
If your boat has an inboard motor, change the engine and transmission oil as well as the oil filter. Leave the motor running for a while, and change the oil while it’s warm. This makes the oil less sticky and easier to change. It also makes sure any contaminants come out with the oil instead of sticking to the inside of your engine.
- Your owner’s manual will tell what kind of oil is ideal for your motor.
- Start by taking out the sump plug and letting the oil drain out into a container.
- If this is difficult with your motor, try to pump the engine oil out with an electric oil extractor or a hand pump. If you can find one, it may be even easier to use a device that can remove the old oil and fill the crankcase up again with new oil.
- Make sure to recycle your old oil.
Eco-Friendly Winterization
Here are a few recommendations for eco-friendly winterization that we’ve found useful.
- Buy antifreeze that contains propylene glycol.
- Avoid antifreeze spills by using a bucket to capture any discharge when flushing your engine.
- Use an oil-absorbent pad under the engine to catch any oil spills.
- The smaller the container of oil or other hazardous material you use, the smaller the spill will be if you have an accident.
- If you keep all your containers in the middle of your boat, you’ll be less likely to suffer an overboard spill if you get hit by a big wave.
- When performing boat maintenance, plug up all your drains and scuppers, and deactivate your bilge pump. Don’t forget to turn it back on when you’re done.
- Check if your marina has a recycling system for oil and antifreeze. If not, find another responsible way to get rid of hazardous waste material. Earth911.org has some good tips on getting rid of waste locally.
The Cost of Winterization
Fuel stabilizer costs around $5 to $10. If you decide not to use stabilizer, your fuel injector or carburetor could become clogged with mineral deposits. This could ruin your motor and end up costing you anywhere from $250 to $1,200.
An aerosol can of engine fogging oil will cost you around $5 to $15. If you don’t fog your engine, you risk corrosive build-up that could coat your cylinders, rings and pistons with grime. This could end up costing you from $2,500 to as much as $15,000 or more.
Changing your engine oil and oil filter will cost you anywhere from $30 to $75, depending on what kind of oil and filter your engine uses. If you don’t change your oil regularly, water can get into the oil and wear your engine down. This can result in excessive fuel use, less engine power, and even total motor failure. Some experts change their oil twice a year, once in the fall and once in the summer, in case moisture has managed to get in during the colder months. Neglecting these regular oil changes could cost you $500 in lost fuel or up to $20,000 if your engine ends up wearing out.
Changing your gear-case lubricant will cost about $10. If your lubricant looks clear and retains its amber color, you don’t need to replace your gear-case seals. If your lubricant is lumpy or opaque, you probably need to change your seals. Changing these in the fall when your marine mechanic has less work might get you a good discount. If you don’t change them, engine complications could end up costing you $2,000 to $6,000.
Battery Maintenance for Winter
If you keep your boat on the water during winter and you have a good solar charger or nearby plug, you should leave your battery on a trickle charge. If you store your boat on land or can’t find a plug, you should remove your battery and store it at home. Even at home, it’s best to keep the battery hooked up to a trickle charge.
Refer to your owner’s manual to find out the specific charging needs of your battery. A typical lead-acid battery, for instance, can take higher voltage than an AGM battery. If you’re wondering about your storage location, you can rest easy knowing that most modern batteries can be stored on a concrete floor.
Conclusion
Here are some final chores to keep in mind as we near the finish line of winterizing your boat.
- Clean your entire boat. Leaving a dirty boat to sit for a long time is the best way to permanently damage the finish.
- Organize your lockers and storage compartments. Not only will you be glad you did come spring, but it may also help you spot problem areas or leaks that you can then fix before they get worse. Look for cans of soda, insect repellent or sunblock, and remove them to avoid future messes.
- Check for standing water in your bilge and other mechanical spaces that could freeze and cause damage during winter.
- Give your gear a longer lifespan by taking anything removable off your boat and storing it at home away from the cold. This includes electronics, fishing rods, clothing and safety equipment.


![Read more about the article Twin Outboards on Small Boat [Key Facts]](https://towers4boats.com/wp-content/uploads/2020/10/Twin-Outboards-on-Small-Boat-300x176.jpg)